
Beekeeping for Beginners
I've taken into account the feedback from fellow Georgians who suggested that the website should include a section dedicated to starting a beekeeping journey. It seems that despite the abundance of literature on the subject, beginner-friendly resources are still not easily accessible.
Here, I’ll try to present — in a very simple and straightforward way — the basic topics related to beekeeping. We won’t be able to cover everything, of course. Still, I hope this will help those just getting started.
Additionally, other sections on our website — The Beekeeper’s Handbook and Stories About Bees — which are based on real-life experiences and practical lessons, will also be useful for beginners.
So, one day, we get the idea: “Why not start a small beekeeping project and buy our first bee colony?” Even if we have zero knowledge about beekeeping, this noble thought is a great first step — let’s follow through and make it happen.
If you know a beekeeper among your friends, it’s a good idea to share this plan with them and ask for advice.
Ideally, the best time to purchase a bee colony is in early spring — February or March. While the colony may not be fully developed across all frames during this time, bees multiply quickly in spring, and it’s also an easier period for inspection. When buying, here’s what you should check: The hive (the bees’ home) The frames (color, age, condition) The amount of honey and pollen stored The queen bee’s age and health (observe her movement and behavior) The condition of the brood (both sealed and unsealed) And finally, make sure there are no signs of disease
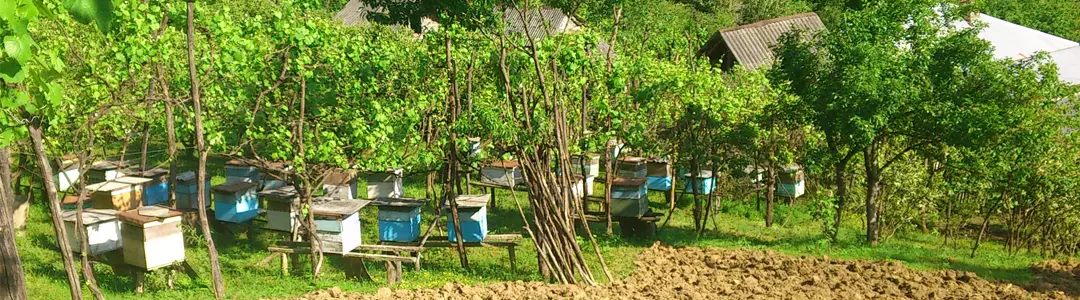
We bought a bee colony. Now it needs to be moved to a designated location.
At first glance, this may seem like a simple task, but there are a few important things to keep in mind:
1. The hive must be secure so that no bees escape during transport.
2. The entrance to the hive should be closed at night to make sure all the bees are inside.
3. Temperature and ventilation must be considered to prevent suffocation during transportation.
3. Do not move a bee colony over short distances — worker bees will return to their old location, leaving the hive empty. (Move at least 5 km away.)
4.Once the hive arrives at its new location, don’t forget to reopen the entrance — wait until morning to do so.
To work with the bees later, you will need the following equipment:
1. Smoker
2. Bee veil (protective face mask)
3. Hive tool
4. Uncapping knife
5. Spare hives
6. Honey extractor
7. Artificial combs and other tools (Wax foundation sheets and more)
Remember!
Never borrow beekeeping equipment from a neighboring apiary.
Place the hive in a location protected from wind. Ideally, the entrance (flight hole) should face east so that the first rays of the morning sun fall on it. By midday, the hive should be in the shade of a tree to avoid overheating.
Now the question arises:
Can a single colony eventually grow into a small apiary of 50 or even more colonies?
Absolutely yes. (See our site’s story: “Now I Enjoy the Memory.”
When aiming for expansion, temporarily set honey production aside and focus solely on colony multiplication.
There are two general methods of bee reproduction: natural and artificial. In our case, artificial reproduction will be more effective. There are several ways to do this — let’s choose the most practical one: splitting a bee colony evenly in half.
To do this, it’s best to place the hive at the center of a 3–4 meter long wooden or metal base (like a beam or rail), positioned so that eventually four hives can fit on it. The distance between hives should be about 1 meter, and the height from the ground around 50 cm.
When the colony has grown strong and covers all the frames, we take a second hive of the same color — or two hives of another color, but matching — and split the colony evenly into them. Make sure both hives get equal amounts of sealed and unsealed brood. Naturally, the queen will end up in one of them.
After a few hours, observe the movement of worker bees in both hives.
If one hive is attracting noticeably more foragers, slightly shift it to the side to balance bee traffic.
In the evening, observe both entrances carefully.
In the hive without a queen, bees will gather at the entrance, move around restlessly, and search for her.
Mark this hive, and on the third day introduce a new queen in a cage or using a queen cell
This is how one colony becomes two. Gradually increase the distance between the two hives to about 2 meters. During a good nectar flow, both colonies can fill their brood nests completely — that is, all twelve frames may become covered with bees.
Next comes the second stage of splitting.
Now we divide the two hives using the same method as before.
If possible, we move these four hives to a summer location (a temporary apiary) where nectar flow is good, or keep them in place and ensure they have proper care and feeding conditions.
If we’ve managed to create four colonies with 9–10 frames each from a single 12-frame hive — all supplied with enough honey and pollen — they will be ready for splitting again next year.
So, it is entirely possible to grow a small apiary with 50 colonies within 3–4 years from a single colony.
Let me remind you once again:
During this period, forget about harvesting honey.
In fact, you may even need to feed the bees, especially in early spring when they start multiplying rapidly.
Reproduction is heavily dependent on food availability.
It has been experimentally proven that an average-strength bee colony consumes over 40 kg of honey and 20–25 kg of pollen annually just to raise brood — as energy and protein sources.
Bees are active year-round, and so is the beekeeper.
Throughout the year, the beekeeper must carry out the following essential tasks:
1. Spring preparations
2. Autumn preparations
3. Wintering preparations
In Georgia’s climate, bee colony renewal begins at the end of December — the queen starts laying eggs. On warm, sunny days, worker bees leave the hive to cleanse their bowels and bring water into the hive to prepare food for the brood.
During the first cleansing flight, the beekeeper should be at the apiary, observing each hive. Through external inspection and by listening to the sounds inside, they determine whether a hive is queenless, if there's a food shortage, or other issues. (See also “Diagnosing Bee Diseases” and “Humidity — the Enemy of Bees” on this website.)
Spring work also includes assessing hive condition, cleaning the hive, and more. The busiest season for the beekeeper is during the main honey flow. At this time, frames, wax, and other supplies must be ready. When bees collect large quantities of nectar, they begin to secrete wax from special glands and start building new comb. The frames are whitened with fresh wax. It's important to encourage the bees to build new frames and expand the hive, so they don't feel overcrowded and begin thinking about swarming. Moreover, new comb invigorates the bees.
Ideally, 4 to 6 new frames should be added. This helps prevent many diseases as well. Once the hive becomes strong and there's no plan to divide it, it’s necessary to place a honey super or an additional brood box on top. When bees cap the honey-filled frames, they should be extracted and replaced in a timely manner, so as not to disrupt their work.
If the bees swarm naturally, it is correct to place the new swarm into a new hive and provide it with as many frames to build as the swarm’s strength allows — which is measured by weight. Sometimes catching the swarm can be difficult, as they may cluster at various heights in trees, waiting for a scout bee to give the signal to move.
I’ve developed the most practical and easy method for retrieving a swarm — one that many beekeepers have appreciated. Take a long stick (preferably bamboo), fasten a dry frame — ideally with some brood but without bees — securely to the top using wire, and gently press it against the cluster. Within a few minutes, the queen will transfer onto the frame, and the rest of the bees will follow. After half an hour, the entire frame can be placed into a new hive. The bees will spread across the frames and begin fanning with their wings — a sign that they are settling in and starting work.
Spring work also includes replacing old queens with new ones.
For this, I recommend that beekeepers use the spiral cage method. Place a mature queen cell inside the spiral cage, from which a new queen should emerge in 1–2 days. Inside the spiral, the old queen and worker bees cannot harm the emerging queen. Once she hatches, she defeats the old queen in battle and takes over the hive. This method is easy, as it doesn’t require finding and removing the old queen. If replacing queens in 50 hives would normally take 1–2 days, using this spiral method, you can requeen all of them in just one hour — imagine how much time you save!